
The bedroom is the single most common fall location in U.S. homes for older adults, accounting for one in four fall-related emergency visits1. Much of that risk concentrates at one moment: getting in or out of bed. A floor to ceiling grab bar, more commonly called a transfer pole, positions a stable vertical handhold exactly where that moment happens. Our overview in bedroom safety planning covers the full range of bedside supports. This article focuses on one specific question: when does a transfer pole belong at the bedside, and how do you set it up to work reliably?

Quick Answer
When does a floor-to-ceiling grab bar help beside the bed?
A transfer pole belongs beside the bed when someone needs a stable vertical handhold to push or pull themselves upright during the sit-to-stand transfer and a wall grab bar is not possible or preferred. Tension-mounted between floor and ceiling with no drilling, most models support 300 lbs and fit ceilings from 7 to 10 feet8. They are portable, repositionable, and reversible.
Key Takeaways
- The bedroom accounts for 25.0% of all home fall-related emergency visits among older adults, ahead of stairs and bathrooms1.
- A transfer pole is tension-mounted between floor and ceiling, requires no drilling, fits ceilings from 7 to 10 feet, and typically carries a 300-lb weight rating.
- Transfer poles support a straight-up pulling motion during the sit-to-stand phase. Bed rails support a lateral push and edge boundary. Matching device to transfer direction is the core decision.
- Set the grab handle at seated mattress height, roughly 18 to 20 inches from the floor for a standard bed, so the arm has mechanical advantage at the start of the rise.
- An occupational therapist can assess which bedside support type fits a specific transfer pattern before anything is installed.
What Is a Floor to Ceiling Grab Bar?
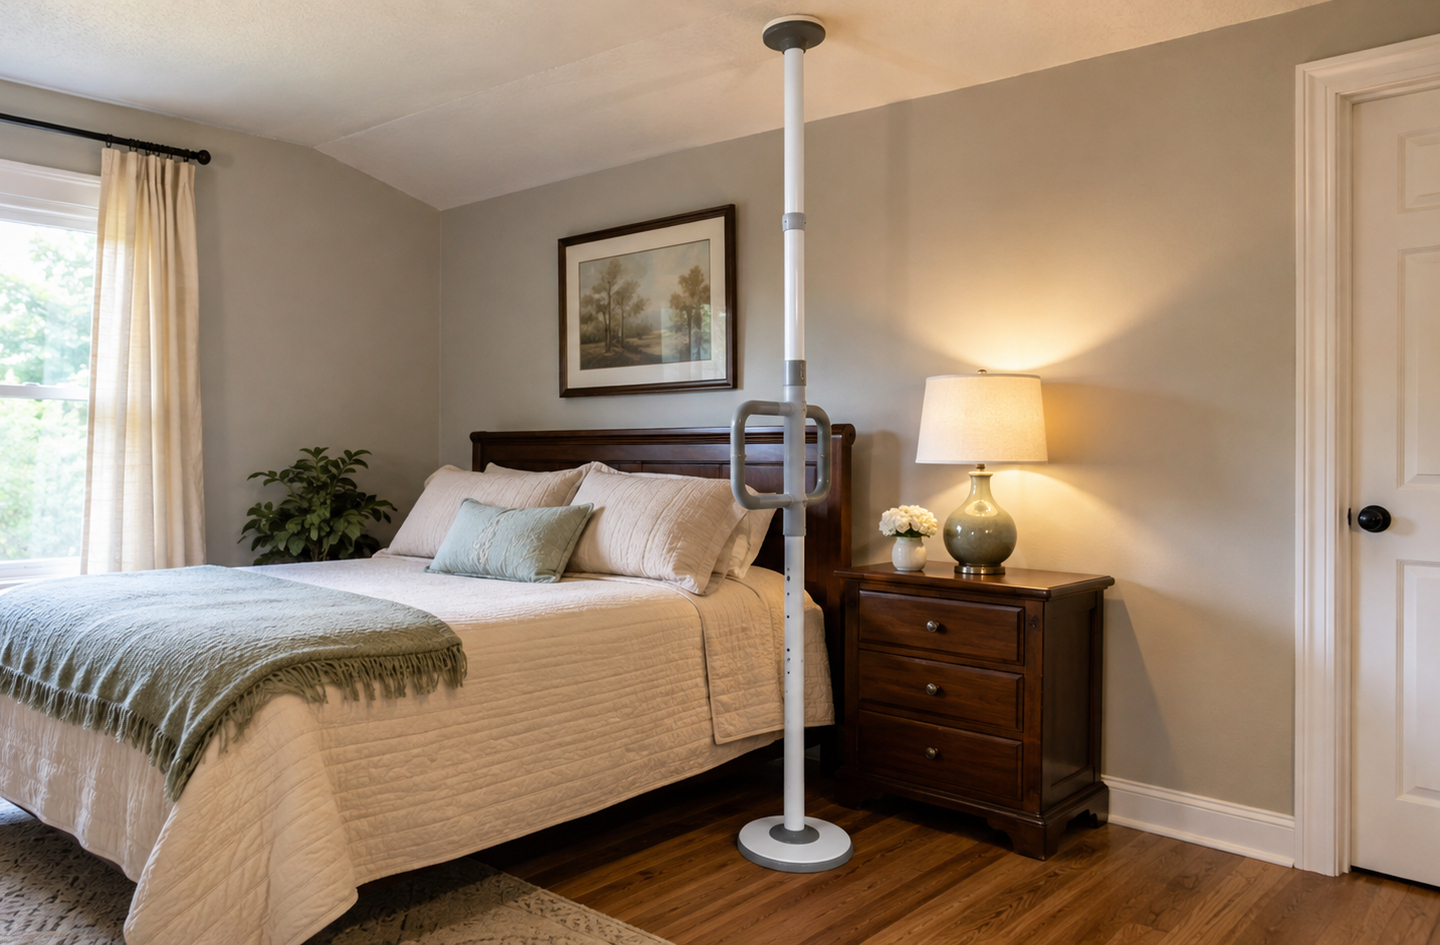
A floor-to-ceiling grab bar is a vertical pole that spans the full room height, held in place by spring or screw tension between the floor surface and the ceiling. It does not attach to the wall. It does not bolt into the bed frame. The tension itself keeps it rigid, and most designs include a threaded adjustment nut that locks the pole at the precise ceiling height of the room.
The device is also called a transfer pole, a bed transfer pole, or a stand-assist pole. All refer to the same function: a fixed vertical surface the person grips and pulls against while rising from a seated position on the edge of the bed.
The horizontal grab handle is the working part
Most transfer poles include a removable horizontal grab handle, a short curved bar that mounts at a chosen height on the pole shaft. That handle is what the person actually grips during the transfer. Without it, the smooth vertical shaft offers a less secure contact point, especially for hands affected by reduced grip strength or arthritis. When evaluating any transfer pole, confirm the grab handle is included, that it can be oriented or locked in multiple directions, and that the pole diameter suits a comfortable grip. The category standard is a 1.5-inch pole diameter8.
How it differs from a decorative tension rod
A floor-to-ceiling transfer pole is built to be loaded laterally. Rated weight capacities in the category typically reach 250 to 300 lbs, and the engineering assumes that a person’s full body weight may be applied horizontally during the rising phase of a transfer. A tension closet organizer rod or a decorative pole lamp is not rated for that kind of force and should never substitute for a purpose-built transfer pole.
When a Transfer Pole Makes Sense at the Bedside
A transfer pole fits a specific pattern of need. Identifying that pattern before installation matters, because the wrong device for the wrong transfer type provides false confidence rather than real support.
Researchers analyzing an estimated 320,751 bed-related fall injuries presenting to U.S. emergency departments annually (2014 to 2023) found that 34.4% occurred during a transition into or out of bed2. The sit-to-stand phase carries disproportionate risk within that window: a 2022 study of 306 video-captured falls in long-term care found that falls during sit-to-stand transfers happened twice as often in the rising phase as in the stabilization phase that follows3. The rising phase, before the person has fully extended their hips and achieved standing balance, is exactly where a transfer pole provides its most direct mechanical advantage.
The transfer pattern where a pole excels
A transfer pole is best suited to a straight-up transfer: the person sits on the edge of the bed, grips the horizontal handle at a comfortable height, and pulls upward and slightly forward to reach standing. The mechanical advantage comes from the pole’s vertical rigidity. It does not swing, compress, or shift under load. For someone who still has enough arm and leg strength to rise but needs a stable reference point to organize the movement, a transfer pole reduces hesitation at the start of that push.
A pole is less suited to lateral transfers, such as moving from a bed to a wheelchair positioned alongside it, or situations where someone needs to bear sustained downward weight on the support for extended periods. In those cases, a different device may serve better. If the transfer pattern is complex or the person’s mobility has changed recently, an occupational therapist can assess which support type actually fits before installation. OT-led home safety assessments have been shown to reduce the rate of falls with a rate ratio of 0.69 in independent living settings6.
Nighttime transfers and nocturia
Nighttime trips from the bed to the bathroom carry specific and often underestimated risk. A 2025 study of 491 hip fracture patients found that 76.8% reported at least one nocturnal void, and nighttime falls occurred in 40.6% of those with severe nocturia (two or more voids per night) compared with 20.4% among those reporting none4. The combination of low lighting, reduced alertness on waking, and the physical effort of rising from a lying position creates compounding friction at the exact moment a transfer pole provides support. For anyone making multiple nighttime trips, the case for a reliable bedside handhold is particularly concrete.
Check Your Floor and Ceiling First
Before deciding on a position in the room, verify that installation conditions will hold the pole reliably under load. Two factors matter most.
Ceiling height and surface
Most transfer poles are designed for ceiling heights between 7 and 10 feet8. Measure from the floor to the ceiling at the intended installation point before ordering. Standard residential ceilings in the U.S. run 8 to 9 feet, comfortably within that range. Vaulted, angled, or sub-7-foot ceilings will not work with most tension-mount designs. Check the specific model’s height range against your measured gap, not against a general assumption about your home.
The ceiling surface also matters. Standard drywall or plaster ceilings accept the top pressure plate without preparation. A heavily textured or popcorn surface reduces plate grip and should be inspected carefully. Suspended drop ceilings (grid-tile systems) are not suitable without a rigid backing directly above the tile, because the tile will compress or dislodge under lateral load. If the room has a drop ceiling, a plywood panel spanning two grid rails provides the needed substrate.
Floor surface
Hardwood, tile, and laminate floors provide a solid base for the bottom pressure plate. Thick carpet or carpet over padding introduces compression under load and allows the base plate to shift slightly as weight is applied. On carpeted floors, some transfer pole models offer an extended base plate that distributes force over a wider area, reducing movement. Check whether the model you are considering has a carpet-compatible base option, especially if the bedroom has deep-pile carpet. A base plate that shifts even a few millimeters during a transfer is a stability problem.
Step 1: Position the Pole for Your Transfer Direction
The position determines whether the pole is reachable at the moment it is needed. Most people decide intuitively (place it next to the bed), but the exact lateral position relative to where you sit changes the ergonomics of the grip considerably.
Align with your seated position, not the headboard
Sit on the edge of the bed the way you would before rising: legs swung to the floor, weight on the mattress edge. Mark that position. The pole should sit so the horizontal grab handle falls within easy reach of your dominant hand without requiring you to lean or rotate your torso. For most people, that places the pole 6 to 12 inches from the mattress edge, roughly level with the hip when seated.
Placing the pole too far toward the headboard means you must lean forward and back during the rise, disrupting balance. Too far toward the foot of the bed and the pole is behind the body when it is needed. Neither placement uses the mechanical advantage the device is designed to provide.
Which side of the bed?
Install on the side of the stronger or more reliable arm. For someone recovering from a hip or knee procedure, the pole typically goes on the unaffected side, so the stronger leg and arm work together during the rise. If both sides are equally capable, install on the side closest to the bathroom door, since the same transfer pole supports both the get-up motion and the first steps toward the destination.
If the bed sits against a wall on one side, the accessible side decides the placement. A transfer pole on the wall side is only functional if there is enough clearance to stand fully beside it, generally at least 24 inches between the mattress edge and the wall.
Step 2: Set the Grip Height
Grip height is the most commonly adjusted variable and the most commonly set wrong. The goal is to position the horizontal handle so the arm is at mechanical advantage at the start of the transfer, not at the end of it.
Start at seated mattress height
Measure the height of the mattress surface from the floor (including any mattress topper). Set the center of the horizontal grab handle at that height. When seated on the edge of the bed, the handle is at approximately hip height. This puts the elbow at a slight bend and the shoulder in a loaded but not overloaded position for the upward pull at the start of the rise.
This is a starting position, not a fixed rule. If the mattress is unusually high (over 22 inches from the floor) or the person’s arm length is shorter than average, the handle may need to come up 2 to 3 inches. Conversely, if the person tends to slump toward the mattress edge before rising, a slightly higher handle gives more clearance during the initial lean-forward phase.
Test the height before locking it
Set the handle provisionally at the measured height. Have the person sit on the bed, reach for the handle, and run through a slow, deliberate practice rise without trusting full body weight to the pole. Look for two failure patterns: elbow fully straightened at the start of the pull (handle too high, arm cannot generate force through the movement), or shoulder rising above the ear to reach the handle (handle too low, forcing an uncomfortable stretch). Either pattern reduces control and places force on the shoulder in a position it cannot sustain reliably. Adjust, repeat, and lock the position once the grip feels natural at the start of the movement.
Step 3: Install the Pole Using the Tension Method
Tension-mount transfer poles require no tools for the basic installation. The process involves extending the pole sections to the room height, positioning it vertically, and tightening the threaded adjustment nut (located near the base or top cap, depending on the model) until the pole is rigidly held between floor and ceiling.
Extend, position, then tension
Fully collapse the pole sections. Hold the pole in the intended location and note the ceiling gap. Extend the sections until the pole is a few inches shorter than that gap. Insert the top cap against the ceiling, hold the base plate against the floor, and begin turning the adjustment nut clockwise to extend the pole into the ceiling. Apply firm tension. The top pressure plate should contact the ceiling with enough force that the pole does not rock when you push on it from either side with moderate hand pressure. If it moves, the tension is not yet sufficient.
Level before locking
A pole installed at even a slight angle to vertical will tend to walk toward plumb under lateral load, which means it shifts slightly during each transfer. Use a small level on the pole shaft after tensioning. If the pole is not plumb, adjust the base plate position before applying final tension. Most residential floors are close enough to level that this check takes under a minute, but it is worth doing deliberately rather than assuming.
Attach the grab handle last
Once the pole is tensioned and plumb, slide the horizontal grab handle onto the shaft at the target height from Step 2. Tighten the set screw or locking collar firmly so the handle cannot rotate or slide under load. Check the orientation: the curved end of the handle should face toward the person as they reach for it. If the model offers multiple handle orientations, choose the one that places the grip closest to the line of pull during the rise, not the one that looks most natural from across the room.
Step 4: Test the Pole Before Relying on It
The installation is complete when the pole passes a load test, not when the adjustment nut is tight. This step is not optional.
Apply lateral load manually
With both hands on the grab handle, apply a strong, sustained lateral push toward the nearest wall, then a push directly away from the bed. Hold each push for 3 to 5 seconds. The pole should not shift, rock, or lose contact with the ceiling or floor surface. If it shifts at all, increase the tension and repeat. On carpeted floors, also push straight down on the handle to check that the base plate does not sink into the pile under sustained vertical loading.
Conduct a supervised first transfer
Have a second person present for the first real transfer. The goal is not to catch a fall but to observe the movement: does the person grip naturally, does the pull direction match what the pole handles, and does the handle height feel correct under real loading? This is also the moment to check that the base plate has not shifted on the floor. On smooth hardwood or tile without grip pads, the base plate can migrate even with correct ceiling tension. The non-slip rubber feet included with most models address this on smooth surfaces; if they are absent, adhesive grip pads under the base work as a substitute.
“Home safety interventions appear to be more effective when delivered by an occupational therapist.”
Gillespie LD et al., Cochrane Database of Systematic Reviews6
An OT assessment before installing any bedside support is not a bureaucratic step. It changes the device selection, the position, and the grip height in ways a general guide cannot specify for a particular person’s transfer pattern, home layout, or medical history. Prepare those questions before the visit and let the assessment inform the installation decisions.
Common Mistakes That Reduce Stability
Placing the pole for aesthetics rather than transfer mechanics
The pole often ends up near the headboard because that position looks natural in the room. The person’s sitting position during a transfer is not at the headboard. Positioning the pole to look right rather than to be reachable at the moment of the rise reduces its value considerably. The correct position is determined by where the person actually sits when swinging their legs to the floor, not by how the room photographs.
Setting grip height at standing shoulder height
A common intuition is to position the handle at a comfortable standing height so it also works as a steadying point once upright. That height places the grip too high at the start of the rise, forcing the shoulder into a position with less mechanical advantage when the pull is actually needed. The handle should serve the beginning of the transfer. Once standing, most people do not need the pole at all for balance.
Skipping the monthly tension check on carpet
Deep-pile carpet compresses under the base plate, and as compression shifts with temperature and humidity over weeks, the ceiling tension changes too. A pole that was firm at installation may develop a small amount of give three months later. On carpeted floors, repeat the lateral load test from Step 4 monthly. On some carpet thicknesses, placing a rigid board under the base plate significantly improves long-term stability.
Using the pole for lateral bed-to-wheelchair transfers
A tension-mount transfer pole is a straight-up vertical pull point. It is not designed to support the sideways weight-bearing involved in a lateral transfer from bed to a wheelchair positioned beside it. A lateral transfer with full body weight on a tension-mount pole asks the base plate to resist a force direction that its geometry does not handle reliably. A purpose-built transfer board, a ceiling track lift, or a gait belt serves that need better.
How the Three Bedside Support Types Compare
Three distinct devices are commonly placed at the bedside for transfer support. Choosing by price or familiarity rather than by transfer type is the most common planning error. For a full look at how to match a bed rail to your specific bed and mattress, including adult entrapment considerations, see our guide to choosing a bed rail for bedside support.
| Feature | Transfer Pole (Floor-to-Ceiling) | Portable Bed Rail | Wall-Mounted Grab Bar |
|---|---|---|---|
| Mounting method | Tension between floor and ceiling; no drilling | Slides under mattress or clamps to bed frame | Screwed into wall studs or with toggle anchors |
| Primary transfer direction | Straight-up pull from seated position | Lateral push; edge boundary; roll support | Multi-directional; fixed to wall angle at installation |
| Portability | Fully removable and repositionable | Removable; moves with the mattress or frame | Permanent; removal leaves wall damage |
| Weight capacity (typical category) | 250 to 300 lbs | 200 to 350 lbs (varies by model) | 250 lbs minimum (ADA standard); more with proper anchoring |
| Height adjustability | Grab handle slides to any position on the pole shaft | Fixed or limited adjustment by model | Fixed at installation height |
| Entrapment risk | None identified in category | Documented: 284 deaths 2003 to 2021 per CPSC data7 | None identified in category |
| Rental or lease-friendly | Reversible, no wall damage | Yes, portable with bed | No |
The portable bed rail’s documented entrapment history is worth understanding clearly. The U.S. Consumer Product Safety Commission identified 284 entrapment deaths involving adult portable bed rails from January 2003 through December 2021, with 92% caused by the victim’s head or neck becoming trapped in a gap in the rail7. A mandatory federal safety standard took effect August 21, 2023. The risk is tied to specific gap dimensions and mattress combinations, which is why evaluating any bed rail against that 2023 CPSC standard matters. A transfer pole and a wall grab bar do not share this structural hazard. The full selection process for bed rails, including how to match rail type to mattress and frame, is covered in the guide to bed rail selection.
For seniors who use a bedside commode as part of their nighttime routine, the short transfer from bed to commode is another moment where a stable handhold reduces both effort and hesitation. Our guide to bedside commode placement for older adults covers how to position the commode along the transfer route and what support points help along that path.
Home hazard modification programs that include grab bars and handrails show a meaningful reduction in falls across the research: a 2023 meta-analysis of 10 randomized controlled trials and 1,960 participants found a pooled risk ratio of 0.935. A transfer pole belongs in that category of modifications when the specific need is a vertical handhold at the sit-to-stand moment, without permanent wall changes.
Frequently Asked Questions
How much weight does a floor-to-ceiling transfer pole need to support?
Category-standard transfer poles are rated to 300 lbs8. That covers body weight plus the dynamic force of pulling during the rise. Choose a model rated at or above the person’s body weight, and never substitute a decorative tension pole, which is not rated for lateral load.
Will a floor-to-ceiling transfer pole work on a standard 8-foot ceiling?
Yes. Most tension-mount transfer poles fit ceilings from 7 to 10 feet8, and standard U.S. residential ceilings of 8 to 9 feet fall within that range. Measure at the exact installation point before ordering, since settled floors or slightly angled ceilings can shift the actual gap by an inch or more compared to the nominal ceiling height.
Is a floor-to-ceiling transfer pole better than a wall-mounted grab bar for the bedroom?
Neither is universally better. A transfer pole requires no drilling, is repositionable, and fits a straight-up pull from a seated position. A wall grab bar is permanent, can be angled to the exact transfer direction, and is anchored directly to a stud. If drilling is possible and preferred, a wall bar often provides higher long-term stability. If the installation must be reversible (rented home, temporary need), the transfer pole is the functional alternative. An occupational therapist can assess which suits the specific transfer pattern.
Does the CPSC entrapment warning apply to transfer poles?
No. The 2023 CPSC mandatory standard applies specifically to adult portable bed rails, which are frame-mounted devices with gaps between the rail and the mattress7. A floor-to-ceiling transfer pole is a freestanding vertical pole with no frame gap that could entrap a head or neck. The two devices sit in different product categories with different risk profiles.
Can a floor-to-ceiling transfer pole be used on carpet?
Yes, with the right base plate and regular tension checks. Deep carpet compresses under the base over time, reducing ceiling tension and pole rigidity. Check the lateral firmness monthly by pushing on the pole from both directions. Some models include a wider base plate for carpet installation; adding a rigid board under the base on thick pile significantly improves long-term stability.
Limitations and Edge Cases
- Ceiling heights under 7 feet or over 10 feet are outside the standard range for most tension-mount transfer poles. A wall-mounted grab bar or a ceiling track lift system may be the only options in those rooms.
- Suspended drop ceilings require a rigid backing panel above the grid tile before a transfer pole tension system will hold safely. Without that backing, the tile compresses and the anchor point fails.
- Transfer poles address the straight-up sit-to-stand moment at the bed. They do not provide fall-barrier protection during sleep, which requires a different device. A bed rail and a transfer pole serve different needs and one does not replace the other.
References
- PMC / American Journal of Lifestyle Medicine – Moreland BL, Kakara R, Haddad YK, et al. “A Descriptive Analysis of Location of Older Adult Falls That Resulted in Emergency Department Visits in the United States, 2015.” 2020.
- PMC / Journal of Clinical Medicine – Tom A, Navarro SM, et al. “Trends and Risk Factors for the Hospitalization of Older Adults Presenting to Emergency Departments After a Bed-Related Fall.” July 15, 2025.
- ScienceDirect / Archives of Physical Medicine and Rehabilitation – Komisar V, van Schooten KS, Aguiar OMG, Robinovitch SN, et al. “Circumstances of Falls During Sit-to-Stand Transfers in Older People: A Cohort Study of Video-Captured Falls in Long-Term Care.” November 2022.
- Sage Journals / Geriatric Orthopaedic Surgery and Rehabilitation – Yigit N, Nazligul AS, et al. “Nocturia and Nighttime Falls in Older Adults With Hip Fractures: A Retrospective Observational Study.” December 2025.
- PMC / PeerJ – Lektip C, Chaovalit S, Wattanapisit A, et al. “Home hazard modification programs for reducing falls in older adults: a systematic review and meta-analysis.” 2023.
- PMC / Cochrane Database of Systematic Reviews – Gillespie LD, Robertson MC, et al. “Interventions for preventing falls in older people living in the community.” 2012 (PMC-indexed 2021).
- National Council on Aging – “Deadly Adult Portable Bed Rail Hazards Target of New Mandatory Safety Standard.” Citing CPSC Federal Register Final Rule, July 2023. Published August 2023.
- Rehabmart – HealthCraft uPole Safety Transfer Pole product specifications: 300-lb capacity, 7 to 10 ft ceiling range, 1.5-inch pole diameter, tension-mount installation. Retrieved August 2026.
Conclusion
A floor-to-ceiling grab bar solves a specific problem: a stable, adjustable vertical handhold at the moment of rising from the bed, with no permanent changes to the wall. Matching it to the right transfer direction, the right lateral position relative to where the person sits, and the correct grip height makes the difference between a device that genuinely helps and one that gets bypassed because it does not fit the movement. The physical setup matters, and so does the broader picture: bed height, nighttime route, lighting, and what other supports the room does or does not provide. See the overview in bedroom safety planning for how the transfer pole fits within a room-wide approach to safer, lower-effort nighttime routines.